PIONEER PLX-CRSS12
SETUP
Connections
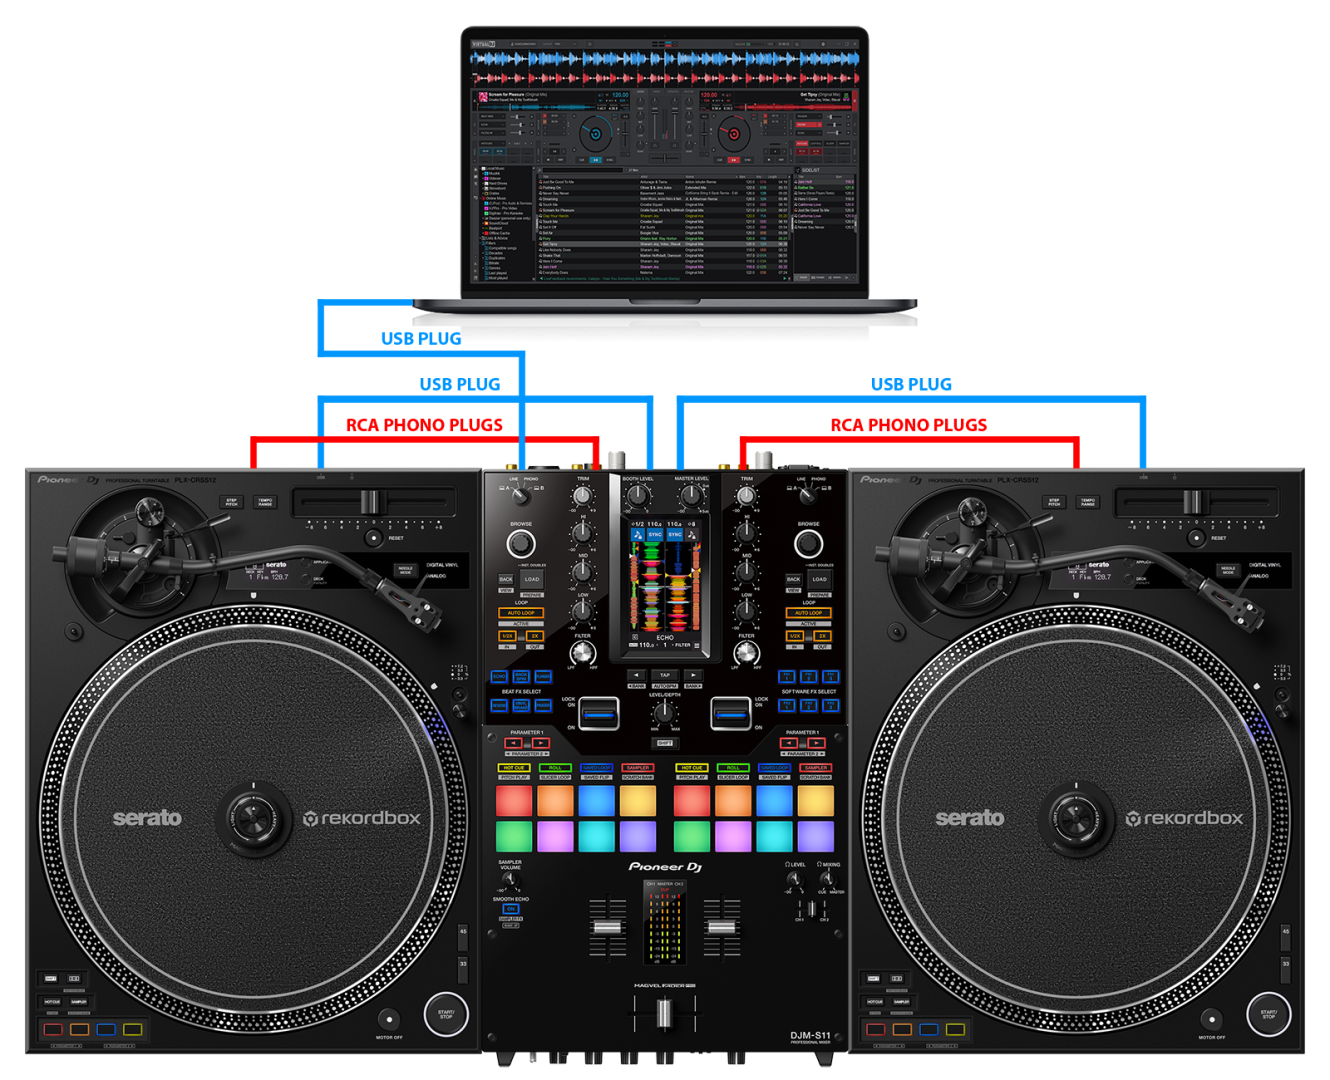
Normally the PLX-CRSS12 will be used as a Digital Vinyl System (DVS) also known as Timecode mode. Up to 4 x PLX-CRSS12 units may be used at the same time controlling 4 software decks.
For each timecode Input (PLX-CRSS12) a stereo input and a stereo output channel is required.
E.g. for a 2 x PLX-CRSS12 setup a 4in/4out USB Audio Interface or a 4in USB 2 channel DVS Ready mixer is required at least.
Connect the PLX-CRSS12 units to the audio interface (or mixer) with the provided RCA phono plugs.
Connect the PLX-CRSS12 units to your computer with the provided USB cables either directly, or through a USB hub.
The following diagram demostrates a connection of 2 x PLX-CRSS12 units with a DJM-S11 mixer.
Firmware & Drivers
Firmware: At the moment this manual was written, no available firmware update exists for PLX-CRSS12.
However, always check for any firmware updates on Pioneer Dj website.
Drivers: No driver software is required for the PLX-CRSS12 to be installed.
The device is USB class compliant and your Operating System will auto-install the necessary driver when connected via USB cable.
(in case you have not done already)
Once VirtualDJ is launched, a Login Window will appear. Please login with your preferred method from the ones provided.
A Pro Infinity or a Pro Subscription License is required to fully use the Pioneer PLX-CRSS12.
Without any of the above Licenses, the controller will operate for 10 minutes each time you restart VirtualDJ.
Buy a license
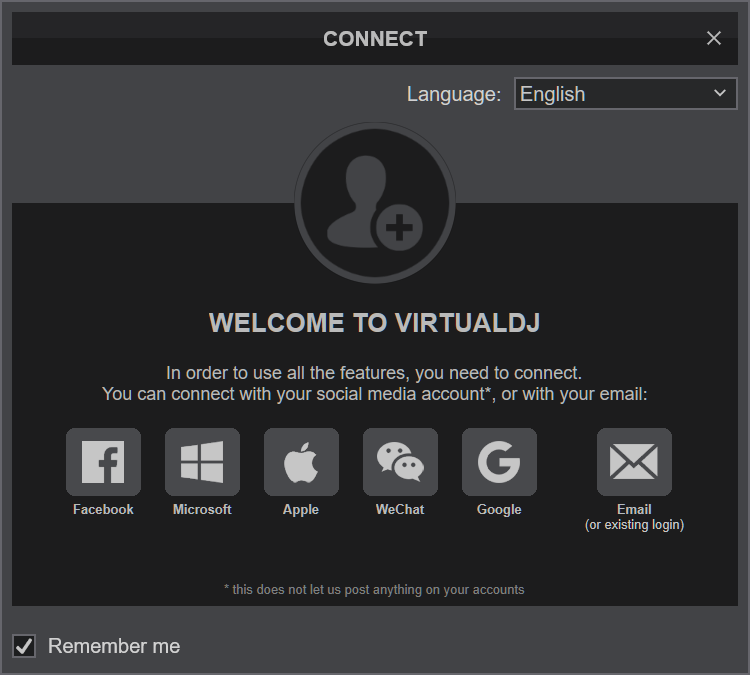
Click to OK.

MIDI Operation
The unit should be visible in the CONTROLLERS tab of Config and the “factory default” should be available/selected from the Mappings drop-down list. The factory default Mapping offers the functions described in this Manual, however those can be adjusted to your needs via VDJ Script actions.
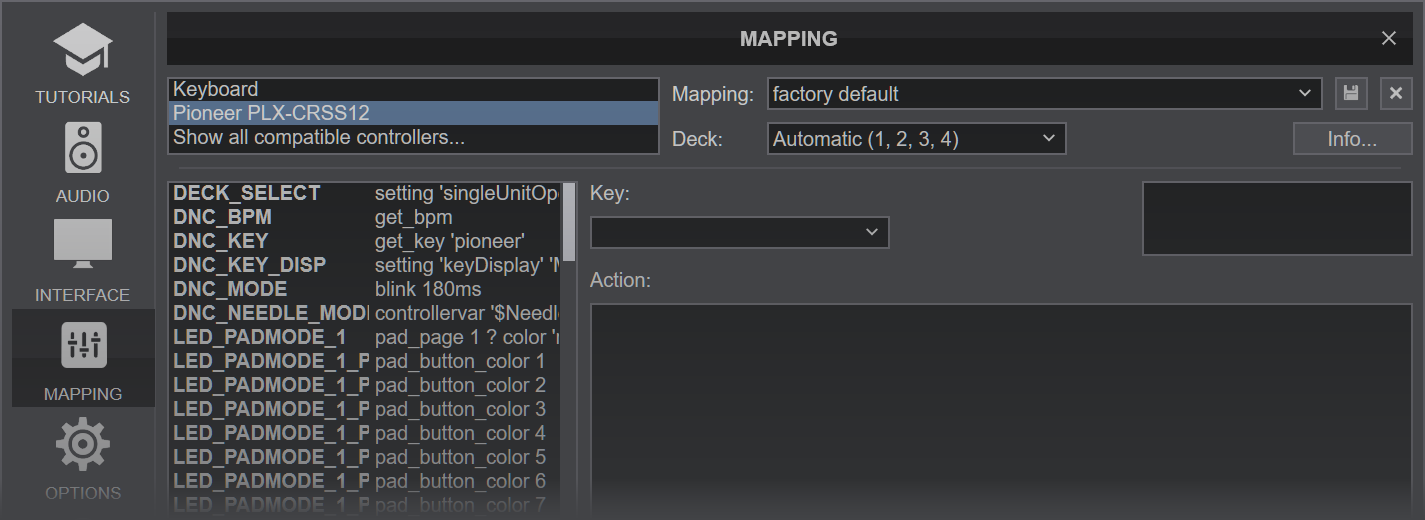
Note that each unit offers 4 Hardware Layers and will be assigned to Decks 1,2,3,4 by default.
The hardware layer (which VirtualDJ deck the unit is going to control) can be set by pressing the "DECK" button on each unit, until the screen shows the desired deck number.
Find more details at VDJ Pedia
AUDIO Setup
The PLX-CRSS12 is not offering any pre-defined audio configuration, as no built-in audio interface is available. Depending on the used USB DVS-ready sound interface or DVS-ready mixer, you may have to manually create the necessary audio configuration (in case those don’t offer a pre-defined Timecode configuration).
For further software settings please refer to the Manuals of VirtualDJ.
CONTROLS
Hardware Controls
Below is a short description for the basic Hardware controls of the Pioneer PLX-CRSS12 hybrid turntable.
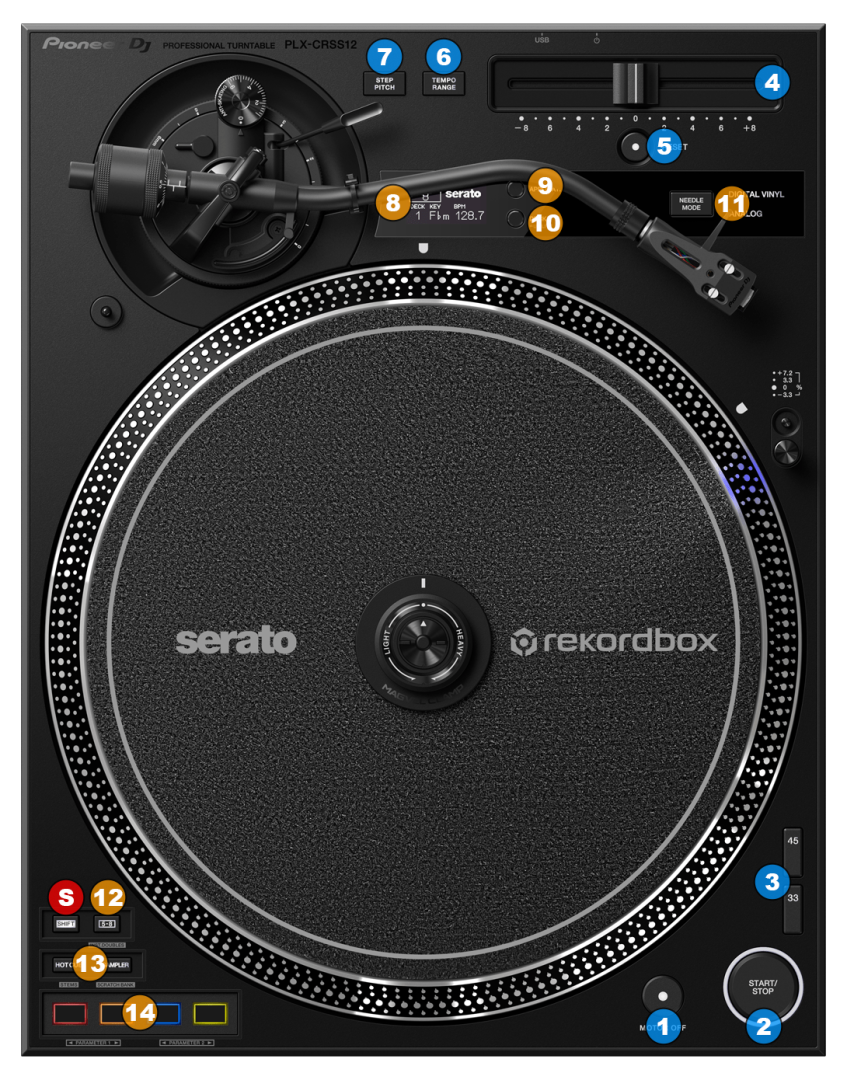
- MOTOR OFF. Power off the motor while the platter is spinning, in order to produce a turntable brake effect.
- START/STOP. Start/stop the platter from spinning.
- SPEED. Select platter rotation speed between 33 and 45 RPM
- PITCH. Adjust the pitch of the playing track.
- RESET. Use this button to deactivate the pitch adjustment (the LED will be turned on). By pressing again the fine adjustment will be re-activated, the turntable will return to the speed set via the pitch fader and the LED will turn off.
- TEMPO RANGE. Select a pitch range of +-8%, +-16% or +-50%
- STEP PITCH. Changes the adjustment method for the speed of the turntable rotation by the operation of the tempo slider.
Please note that each one of the previously mentioned controls is capable of sending MIDI messages and those are pre-defined but most of them are not assigned to any VirtualDJ script action, since those will still keep controlling the hardware features of the unit.
Software Controls
- LCD DISPLAY. Shows Tempo range, BPM, Key & Deck number information.
- APPLICATION. Toggles application mode of the PLX-CRSS12 between Rekordbox and Serato modes.
For optimal usage with VirtualDJ, please select Serato mode. - DECK. Select which hardware deck layer is active, and therefore which deck each unit is going to control.
- NEEDLE MODE. This button toggles between the "Analog" and "Digital Vinyl" modes of the unit.
When "Analog" mode is used, a physical timecode (DVS) record has to be played in order to provide the timecode signal to the software.
When "Digital Vinyl" mode is used, the unit generates it's own timecode signal without the need of a physical timecode record being played, or the needle touching the vinyl. Depending on the "application" mode, the unit will generate different timecode signal.
You need to select "Serato" application mode in order to use "Digital Vinyl" mode in VirtualDJ
- S SHIFT. Press and hold this button to access secondary functions of other controls on the PLX-CRSS12.
- 5-8. Press this button down to toggle between controlling pads 1-4 or 5-8 when using the pad buttons (14).
While holding this button down, use the pad buttons (14) to adjust the parameters of the selected pad page (if any).
Hold down SHIFT and then press this button momentarily to clone the song from the other deck to this deck (instant doubles). - PAD MODE. Use these buttons to select the desired pad mode for the pads.
The unit offers 8 different pad modes.
Press the first button once to access the first pad mode (Hotcues)
Press the second button once to access the second pad mode (Sampler)
Hold down SHIFT and then press the first button once to access the third pad mode (Stems)
Hold down SHIFT and then press the second button once to access the fourth pad mode (Scratchbank)
Doubleclick the first button to access the fifth pad mode (Autoloop)
Doubleclick the second button to access the sixth pad mode (Beatjump)
Hold down SHIFT and then doubleclick the first button to access the seventh pad mode (Manual loop)
Hold down SHIFT and then doubleclick the second button to access the eighth pad mode (Key cue)
You can assign different pad pages on each pad mode, by using VirtualDJ GUI - PADS. The 4 pad buttons offer different functionality depending on the selected pad page.
While "5-8" button is held down, use the first 2 buttons to control the first parameter of the selected pad page, and the last 2 buttons to control the second parameter of the selected page.
CONTROLS
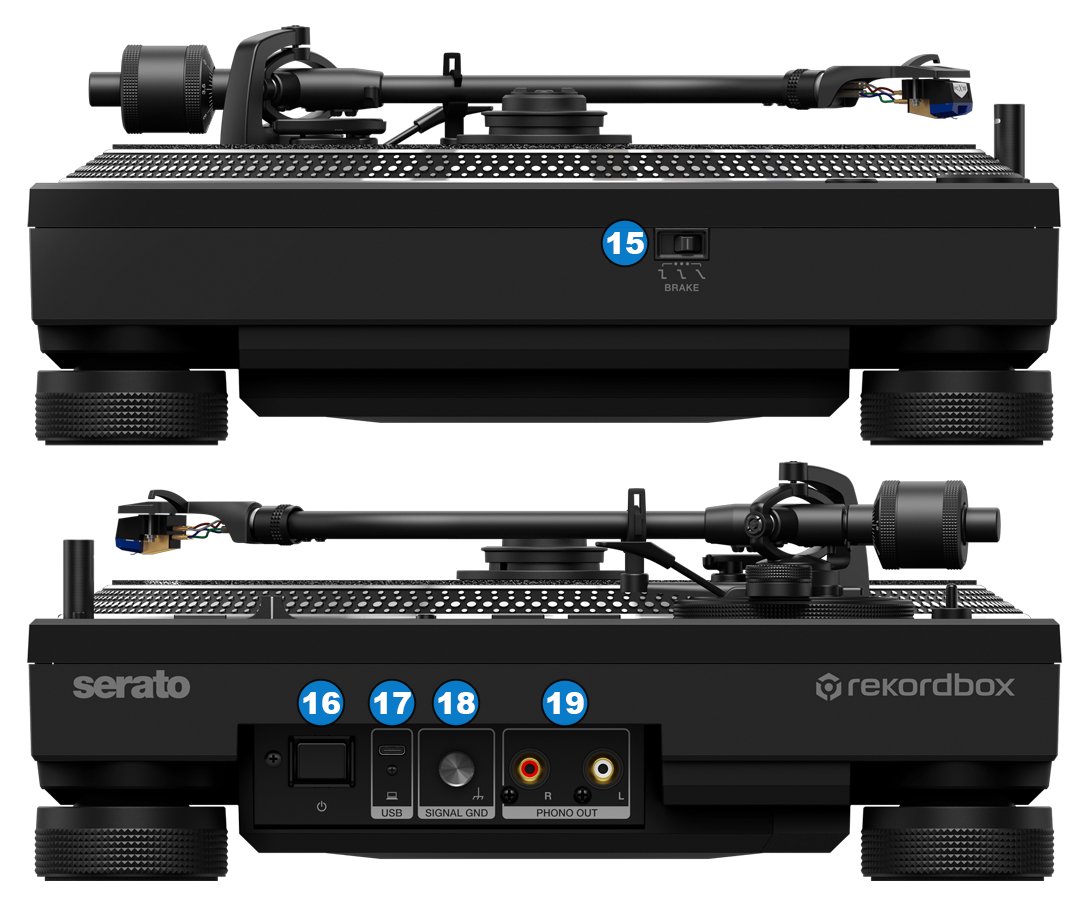
- BRAKE FORCE. Select the force that's applied on the platter when you press the START/STOP button to stop the platter. Three options are available.
- POWER SWITCH. Use this switcher to power on/off the Pioneer PLX-CRSS12
- USB PORT. Use this USB Type C port to connect the PLX-CRSS12 with your computer either directly or via a USB hub / mixer with an on board USB hub.
- GND SCREW. Use the supplied cable to ground the turntable with your mixer.
- RCA OUTPUT. Use the supplied cable to connect the PLX-CRSS12 with your mixer. The RCA outputs supply a PHONO level signal and they have to be connected on a phono input on your mixer.
